How To Cancel Shared Links In Terabox?
Managing shared links in cloud storage is a critical aspect of maintaining digital security and privacy. What if you’ve shared a confidential document with a colleague, and months later, that link is still active? Anyone with the link can access your sensitive information, posing a significant risk. So, what should you do in this scenario?
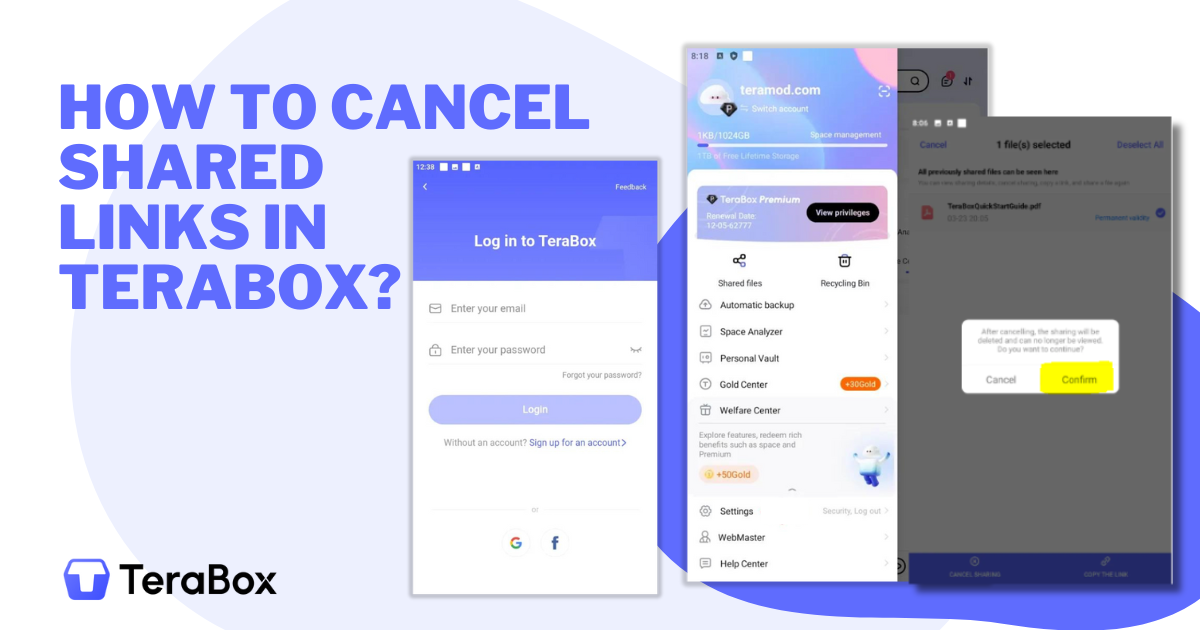
To protect your confidential documents, you can cancel the shared links. How? Simply go to your profile, tap on shared files, click the file for which you want to cancel the link, tap the cancel option, and hit the confirm button to proceed.
We will walk you through the simple yet essential steps to cancel shared links in Terabox, empowering you to protect your data and stay secure in the digital world. But before that, understanding what the shared links are, is necessary. So, let’s get started!
Summary
By regularly reviewing and canceling shared links, you can protect your sensitive information from unauthorized access. The process is simple: access your profile, navigate to shared files, select the link you wish to cancel, and confirm the cancellation.
Taking the below steps not only helps secure your data but also provides peace of mind, knowing that your shared files are under your control. Following these practices into your routine, you can confidently share files when needed, knowing that you can easily revoke access when needed.
What Are Terabox Shared Links?
Terabox shared links are unique URLs generated within the Terabox cloud storage platform that allows users to share access to specific files or folders with others. These links can be distributed via email, messaging apps, or any other communication channel, enabling recipients to view or download the shared content without needing a Terabox account.
Shared links are a convenient way to collaborate and share large files, but they also come with security risks if not properly managed, as anyone with the link can access the shared files. Users can control access by setting permissions, adding passwords, or setting expiration dates for the links.
Step-by-Step Guide to Cancel Shared Links in Terabox
Canceling shared links in Terabox is crucial for maintaining the privacy and security of your files. What is the best? The process is straightforward. Let me guide you through it, step by step, so you can easily secure your sensitive information.
Step 1: Start removing shared links by logging in to the Terabox Account. For this click the Terabox APK icon, enter your credentials (username and password), and click on the login button. Also, you have an option to continue with Google or Facebook. So choose any of your preferred methods.

Step 2: Once logged in, you will be taken to the main dashboard. Click on “Profile” located in the top right corner of the mobile screen. A navigation menu will appear with multiple options including shared files, recycle bin, automatic backup, and so on.

Select the option “Shared” or “Shared Links” in the sidebar. A list of all the files and folders you have shared via links will be in front of you.

Step 3: In the “Shared” section, find the specific file or folder whose link you want to cancel. Click on the file or folder to reveal a menu or options list. It might be represented by a three-dot icon or a “Share” button next to the file name.
Step 4: In the sharing options, look for a button or link that says “Manage Links,” “Link Settings,” or something similar. Click on this option to see the details of the shared link. There should be an option to “Remove Link,” “Cancel Sharing,” or “Delete Link.” Click on this to cancel the shared link.

Step 5: After tapping cancel sharing, a confirmation dialog might appear asking if you are sure you want to cancel the shared link. Confirm your action to proceed.

Step 6: Go back to the “Shared” section to ensure that the file or folder no longer appears in the list of shared items.

